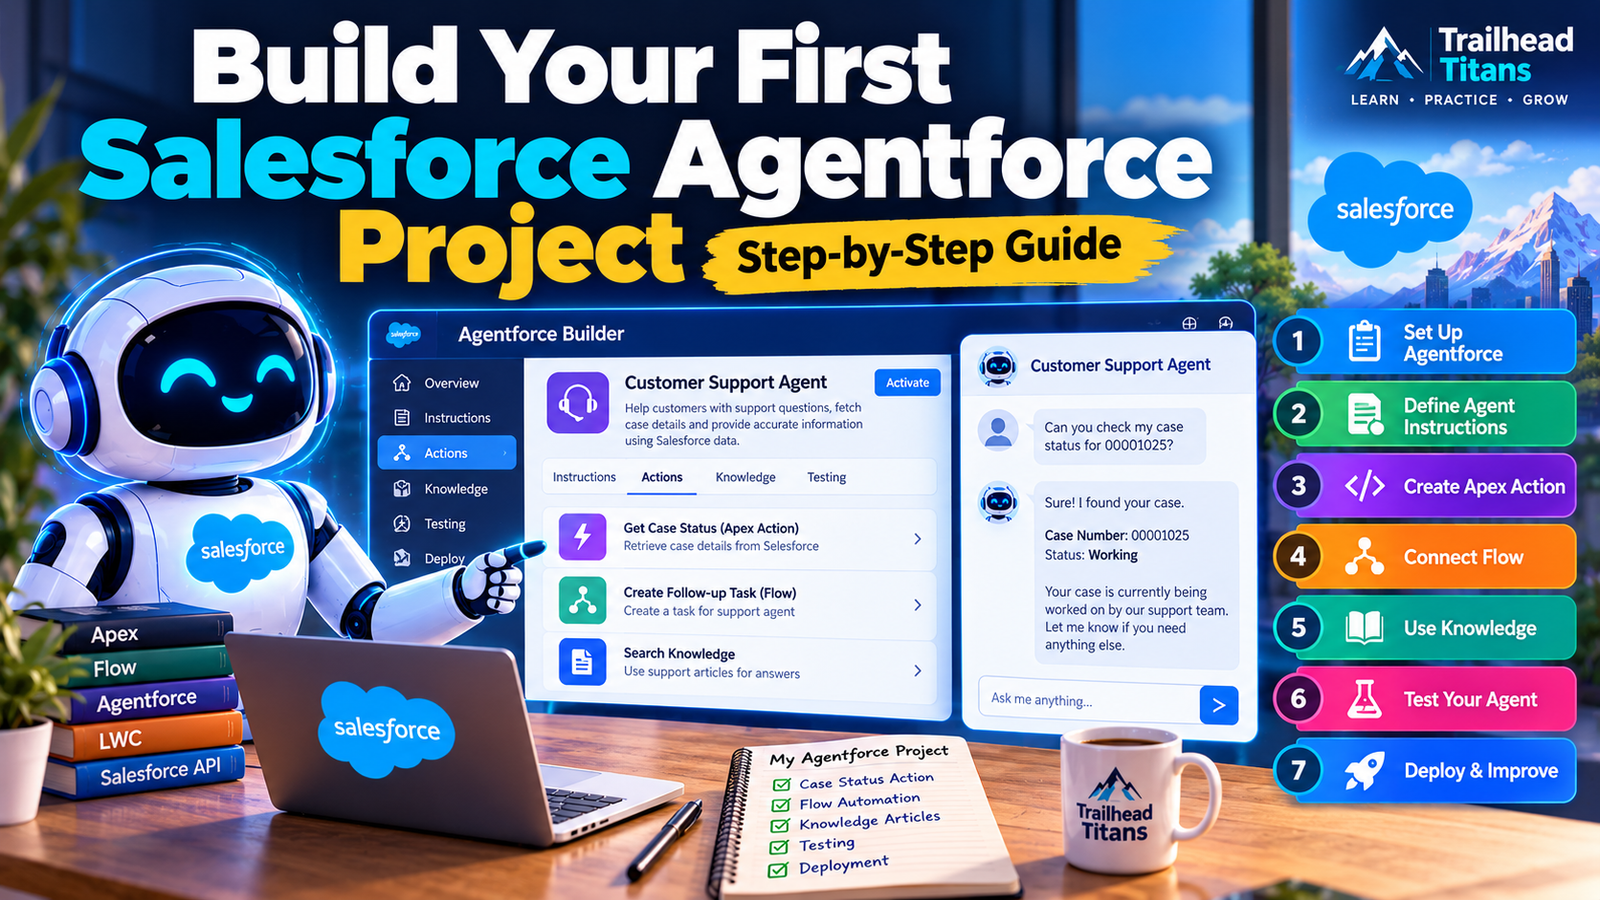
Learn how to build an AI-powered customer support agent in Salesforce using Agentforce, Flow, Apex, and real-world business scenarios.
Artificial intelligence is changing how businesses interact with customers. Instead of relying entirely on manual support teams, companies can use AI agents to answer questions, retrieve information, and assist with business processes.
Salesforce Agentforce enables developers and admins to build AI agents that work with Salesforce data and business logic.
But how do you build your first Agentforce project from scratch?
In this hands-on tutorial, we will build a Salesforce Customer Support Agent that helps customers find case information, understand support processes, and receive relevant assistance.
By the end of this guide, you will understand the main components of an Agentforce project, how to create custom actions, how to connect Apex and Flow, and how to test your agent before deployment.
What Is Salesforce Agentforce?
Salesforce Agentforce is a platform for building AI agents that can interact with users, use configured actions, and work with business data under defined instructions and permissions.
Unlike a traditional chatbot that primarily responds to predefined questions, an Agentforce agent can use available actions to perform supported tasks.
For example, a customer might ask:
- “What is the status of my support case?”
- “How can I reset my password?”
- “Can you explain the warranty process?”
- “What should I do if my issue is not resolved?”
Depending on its configuration, an agent can respond using approved knowledge sources or invoke Salesforce actions to retrieve relevant information.
Salesforce provides tools for building agents through Agentforce Builder, as well as developer tools for authoring, testing, and deploying agent metadata. https://developer.salesforce.com/docs/ai/agentforce/guide/get-started.html
Project Overview: Customer Support Agent
Let’s build a practical project that you can use for learning, portfolio development, and interview preparation.
Project objective
Create an AI-powered support agent that can:
- Understand customer support questions.
- Retrieve a support case’s status using a custom Apex action.
- Provide answers based on approved support knowledge.
- Handle invalid requests and missing information gracefully.
- Follow Salesforce access controls and business rules.
Technology stack
| Technology | Purpose |
|---|---|
| Salesforce Agentforce | Conversational AI agent |
| Agentforce Builder | Agent configuration and testing |
| Apex | Custom server-side business logic |
| Salesforce Flow | Optional automation and orchestration |
| Knowledge | Approved support information |
| Salesforce security | Access control and data protection |
| Agentforce Testing Center | Conversation and action testing |
Prerequisites: A Salesforce development environment with Agentforce enabled, the required permissions and applicable licensing, plus access to Apex development tools. Feature availability varies by edition and agent type.
Step 1: Prepare Your Salesforce Environment
Before building the agent, prepare your development environment.
- Sign in to your Salesforce development org.
- Confirm that Agentforce is available and enabled.
- Open Agentforce Studio and locate Agentforce Builder.
- Verify that you have the permissions required to create and manage agents.
- Create sample Case records for testing.
- If you plan to use Knowledge, prepare approved support articles.
Use a sandbox or suitable development environment for the initial implementation.
For this project, create a few sample Cases with different statuses, such as New, Working, and Closed.
Make sure the records contain realistic but non-sensitive test data.
Step 2: Define the Agent’s Responsibilities
Before configuring the agent, define what it should and should not do.
Our support agent will have two main responsibilities:
Responsibility A: Answer support questions
It should use approved support information to answer questions about troubleshooting, processes, and frequently asked questions.
Responsibility B: Retrieve case status
It should use a custom Apex action to retrieve the status of a Case when an authorized user supplies a Case Number.
For example:
Customer: “Can you check case number 00001025?”
Agent: “Your case is currently being worked on.”
The actual response must come from the matching Salesforce record, not from an AI-generated guess.
The agent should not reveal case information if the user lacks the required access.
Step 3: Create the Agent in Agentforce Builder
Open Agentforce Studio and create a new agent using the current Agentforce Builder experience.
The exact labels and available templates can vary depending on your org and enabled features.
Configure the following:
- Agent label: Customer Support Agent
- Description: Assists authorized users with support questions and case-status inquiries.
- Instructions: Defines the agent’s purpose, response style, limitations, and escalation rules.
- Subagents: Configure the appropriate responsibilities for support questions and case-status retrieval.
- Actions: Add the actions the agent is permitted to execute.
Salesforce introduced the term subagents for agent topics in April 2026. Some documentation and interfaces may still use the older terminology. https://developer.salesforce.com/docs/ai/agentforce/guide/agent-script.html
Example agent instructions
You can adapt the following instructions for your project:
“You are a Salesforce Customer Support Agent. Help users with approved support questions and case-status inquiries. Use configured Salesforce actions whenever current record information is required. Never invent case numbers, case statuses, or record details. Ask for a Case Number when necessary. If a record cannot be accessed or found, provide a neutral response without exposing confidential information. Do not disclose sensitive data. Escalate requests that require human judgment or exceed your configured capabilities.”
These instructions establish the intended behavior, but they are not a replacement for Salesforce permissions, Apex security, or server-side validation.
Step 4: Build a Custom Apex Action
Now let’s create the technical part of the project.
We will expose an Apex method as an invocable action so the agent can retrieve a Case’s status.
Salesforce supports custom Agentforce actions backed by Apex invocable methods. https://developer.salesforce.com/docs/ai/agentforce/guide/get-started-actions.html
Apex code
Create an Apex class named AgentforceCaseStatusAction.
public with sharing class AgentforceCaseStatusAction {

    public class Request {
        @InvocableVariable(
            required=true
            label='Case Number'
        )
        public String caseNumber;
    }

    public class Response {
        @InvocableVariable(label='Found')
        public Boolean found;

        @InvocableVariable(label='Case Status')
        public String status;

        @InvocableVariable(label='Message')
        public String message;
    }

    @InvocableMethod(
        label='Get Case Status'
        description='Retrieves the status of an accessible Case'
    )
    public static List<Response> getCaseStatus(
        List<Request> requests
    ) {
        List<Response> responses = new List<Response>();
        Set<String> caseNumbers = new Set<String>();

        for (Request request : requests) {
            if (request != null &&
                !String.isBlank(request.caseNumber)) {
                caseNumbers.add(request.caseNumber.trim());
            }
        }

        Map<String, Case> casesByNumber = new Map<String, Case>();

        if (!caseNumbers.isEmpty()) {
            for (Case c : [
                SELECT CaseNumber, Status
                FROM Case
                WHERE CaseNumber IN :caseNumbers
                WITH USER_MODE
            ]) {
                casesByNumber.put(c.CaseNumber, c);
            }
        }

        for (Request request : requests) {
            Response result = new Response();
            result.found = false;

            String number = request == null
                ? null : request.caseNumber;

            if (String.isBlank(number)) {
                result.message = 'Please provide a Case Number.';
            } else {
                Case matchingCase =
                    casesByNumber.get(number.trim());

                if (matchingCase == null) {
                    result.message =
                        'The case could not be found or accessed.';
                } else {
                    result.found = true;
                    result.status = matchingCase.Status;
                    result.message =
                        'The case status was retrieved successfully.';
                }
            }

            responses.add(result);
        }

        return responses;
    }
}
How does this Apex class work?
1. Invocable method
The @InvocableMethod annotation exposes the method for use as an action in supported Salesforce automation and Agentforce configurations.
2. Input and output
The Request class receives a Case Number. The Response class returns the result, status, and a message.
3. Bulk-safe querying
The implementation gathers Case Numbers into a set and performs one SOQL query instead of querying separately for each request.
4. Security
The class uses with sharing and WITH USER_MODE to enforce record-sharing and applicable object- and field-level access controls for the query.
5. Missing records
When a case is missing or inaccessible, the action returns a neutral message instead of revealing whether an unauthorized record exists.
Important: Validate this example in your target org. Confirm that the agent execution identity has the intended Case access, test the required permissions and failure paths, and adapt error handling to your organisation’s policies.
Step 5: Add the Apex Action to Agentforce
After saving the Apex class, make the action available to your agent.
- Open Agentforce Builder.
- Open the appropriate agent configuration.
- Navigate to the action management area.
- Add or create a custom action backed by the Apex invocable method.
- Select Get Case Status.
- Configure its input and output mappings where required.
- Provide a clear description explaining when the action should run.
- Save your changes.
The action description should make it clear that the agent must have a Case Number before invoking the action and must use the returned status rather than inventing a value.
For the exact setup flow, follow the official Agentforce Actions documentation.
Step 6: Connect Salesforce Flow (Optional)
You can extend the project using Salesforce Flow when additional business automation is required.
For example, you might want a support process to:
- Route eligible cases to a support queue.
- Create a follow-up task.
- Notify an assigned agent.
- Trigger an approved escalation workflow.
Build and test the Flow independently first.
If your design requires an agent to invoke a Flow, expose the supported Flow action through the relevant Agentforce configuration and define exactly when it may execute.
For example, a follow-up task should not be created just because a user asks a general question. The agent should follow the configured business conditions and permissions.
Best practice: Use Flow for declarative automation and Apex when custom logic, advanced validation, or programmatic processing is appropriate.
Step 7: Test Your Agent
Testing is one of the most important parts of an Agentforce project.
Open the agent’s Preview panel and test different user messages. Review the action execution and interaction details to understand how the agent selected and invoked each action.
Salesforce provides a Testing Center and developer-oriented testing tools for evaluating agent behavior. https://developer.salesforce.com/docs/ai/agentforce/guide/testing-api-get-started.html
Test scenarios
| Test case | Expected behavior |
|---|---|
| User supplies an accessible Case Number | Return the actual Case status |
| User does not provide a Case Number | Ask for the missing information |
| User supplies an invalid number | Return a neutral not-found message |
| User asks a general support question | Use approved support information |
| User requests a restricted record | Do not disclose inaccessible information |
| Action fails unexpectedly | Provide a safe response or escalation path |
| User asks for an unrelated task | Explain the agent’s scope or redirect appropriately |
Test both successful and unsuccessful paths.
Also verify that the agent does not confuse one customer’s case with another customer’s case, fabricate status information, or perform unauthorized actions.
Do not rely on a single successful conversation as evidence that the agent is production-ready.
Step 8: Improve the Agent’s Reliability
Once the basic implementation works, improve its behavior systematically.
Refine instructions
Use concise instructions that define the agent’s role, action-selection rules, constraints, and escalation behavior.
Improve action descriptions
Explain what each action does, what information it requires, and when it should be used.
Review failures
If the agent chooses the wrong action, inspect the interaction trace and refine the instructions, action descriptions, or subagent routing.
Add repeatable tests
Create test cases for expected action sequences, incorrect inputs, restricted records, and unexpected user requests.
Monitor the results
Use available testing and monitoring capabilities to identify recurring errors and improve the agent.
Salesforce’s Agentforce testing guide provides details about available testing approaches and developer tooling.
Step 9: Deploy the Agent
After the agent passes your tests, prepare it for deployment.
A responsible deployment process includes:
- Review the agent instructions and actions.
- Confirm the correct permissions for the execution identity.
- Validate Apex, Flow, and any required dependencies.
- Test in a sandbox or other suitable pre-production environment.
- Use your team’s approved source-control and deployment process.
- Activate the agent through the supported configuration workflow.
- Monitor the agent and review its behavior after release.
For teams using Salesforce CLI and VS Code, Agentforce DX supports agent authoring, testing, and metadata management as part of a development workflow. https://developer.salesforce.com/docs/ai/agentforce/guide/agent-dx.html
Remember that deployment procedures and channel availability depend on the type of agent, org configuration, licensing, and enabled Salesforce features.
Step 10: Add This Project to Your Salesforce Developer Portfolio
A working Agentforce project can demonstrate more than familiarity with an AI tool.
Document the following:
- The business problem you solved.
- Your agent’s architecture.
- The responsibilities of each subagent.
- Your Apex action and its input/output contract.
- The security controls you implemented.
- The test scenarios you executed.
- The problems you encountered and how you resolved them.
- The improvements you would make before production deployment.
If you publish the project on GitHub, remove credentials, sensitive data, and organisation-specific information. Include a README with setup requirements and screenshots that use sample data.
In interviews, be prepared to explain why you used Apex, where Flow would be suitable, how permissions are enforced, and how you validated the agent’s behavior.
Common Mistakes to Avoid
Mistake 1: Treating Agentforce as a normal chatbot
An effective agent needs clear responsibilities, appropriate actions, business context, and controlled access to data.
Mistake 2: Writing vague instructions
Instructions such as “Help customers with everything” make the agent’s responsibilities unclear. Define its scope explicitly.
Mistake 3: Ignoring security
Never assume that natural-language instructions alone prevent unauthorized data access. Enforce access controls in the underlying Salesforce implementation.
Mistake 4: Skipping negative tests
Test missing values, inaccessible records, unexpected requests, and failed actions—not just successful scenarios.
Mistake 5: Deploying without monitoring
Agent behavior must be evaluated and improved after deployment, especially when the underlying data, business rules, or configuration changes.
Conclusion
Building your first Salesforce Agentforce project is an excellent way to combine AI, CRM data, automation, and custom development.
In this tutorial, we designed a Customer Support Agent, configured its responsibilities, created a custom Apex action, explored Flow integration, and covered testing and deployment.
The most important lesson is that building an AI agent is not simply about writing instructions. It is about connecting AI to reliable business processes while maintaining security, testing, and control.
Start with a small use case, validate it thoroughly, and expand only when the behavior is reliable.
Build your first Agentforce project, document what you learn, and use it to demonstrate your Salesforce development skills.
Frequently Asked Questions (FAQs)
1. Is Salesforce Agentforce suitable for beginners?
Yes. Beginners can start with Agentforce Builder and a simple support use case. Learning Salesforce fundamentals, data access, and basic automation will make it easier to build reliable agents.
2. Do I need Apex to build an Agentforce agent?
No. Some agents can be built using declarative configuration and existing actions. Apex is useful when custom server-side logic or an invocable action is needed.
3. Can Agentforce call Salesforce Flow?
Yes. Supported configurations allow agents to use Flow-based actions. You should define the required inputs, outputs, permissions, and business conditions.
4. How do I test an Agentforce agent?
Use the Preview panel and available testing tools to evaluate responses, action selection, data retrieval, error handling, and expected behavior. Include negative and security tests.
5. Can I add an Agentforce project to my resume?
Yes. Describe the business problem, architecture, actions, security considerations, tests, and your specific contribution. Only claim features you actually implemented and validated.
6. Is Agentforce free to use?
Access depends on your Salesforce edition, development environment, agent type, and applicable licensing. Check your org’s entitlements and current Salesforce pricing before planning a deployment.
7. What should I learn after building this project?
Consider learning Agent Script, advanced Apex actions, Flow orchestration, secure integrations, Agentforce DX, automated testing, and deployment practices.